intro

A random series of articles on war gaming in 40K, FOW and other systems. The headings are, WiP; Conversions and models in various states of assembly. PiP; Paint works on various models. Mission Critical; scenarios or missions to bring a bit of a twist to a normal game. MiA; rules for units and characters that could/should/might appear in a game. Dig In; How to guides on making various types of terrain for different game systems. Sit Rep; Battle reports and after action reports on games played

Monday, April 30, 2012

Sitrep (40K): Return to Retcon round 4


Round 4 Vs Johnny playing Imperial Gaurd
Deployment: Spearhead
Primary Objective: Seize ground. Three objectives, one in the centre and one in the centre of each quarter in no mans land.
Secondary Objective: Capture and control.
The Enemy:
1 Command squad
2 Valkyries
5 Veterans squads in chimeras
1 Manticore
1 Bane wolf
1 Marbo
1 squadron of Hyrdas
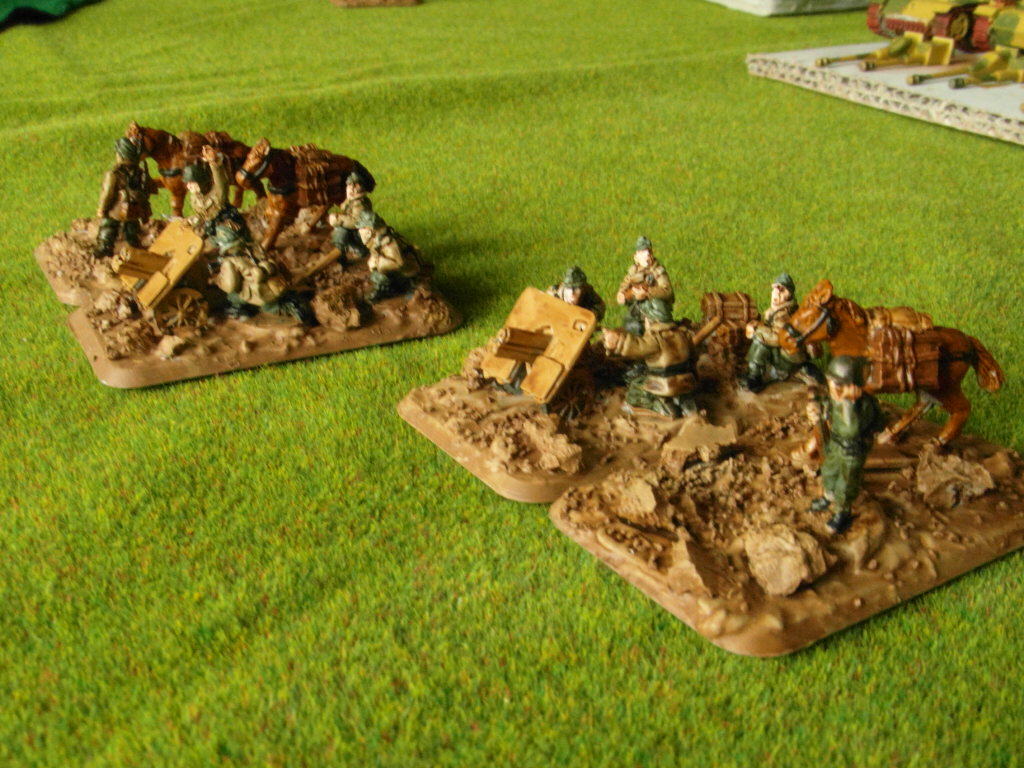
Fire base 1

The Battle:
Johnny's list seemed still to be in development and a bit heavy on the Veterans side. The IG got to go first and deployed evenly in their quarter. The orks opted for the reserve game. The guard move to form two separate fire bases. One based on the manticore, the other based on the hydras. The veterans fanned out trying to deny Ghaz and the Kommandos a path on to the table but their numbers were too small and the run moves did not help. Even worse Marbo showed up at the wrong time and ended up hiding in the latrines.

Fire base 2

Ghaz predictably showed up at the weak spot in the guard coverage and destroyed a veteran squad, a bane wolf and immobilised a chimera. Two wagon mobs moved on and one tried to Waaagh into contact with hydras but was just out. The other secured the Ork base. Two Kopta mobs arrived one destroyed a Veteran squad while the other stunned a chimera, with Vets inside, guarding the IG base.

Kommandos do what they do best.
 guide Ghaz to something tasty :)

With Koptas and Ghaz in close contact the IG tried to get a good fire solution in place. The Waaaghing mob was hammered by the manticore but not destroyed. The wagon mob guarding the Ork was attacked by a vendetta, which dropped off melta Vets, which destroyed the wagon but left the mob intact. While a kopta mob was taken out by Marbo and friends.

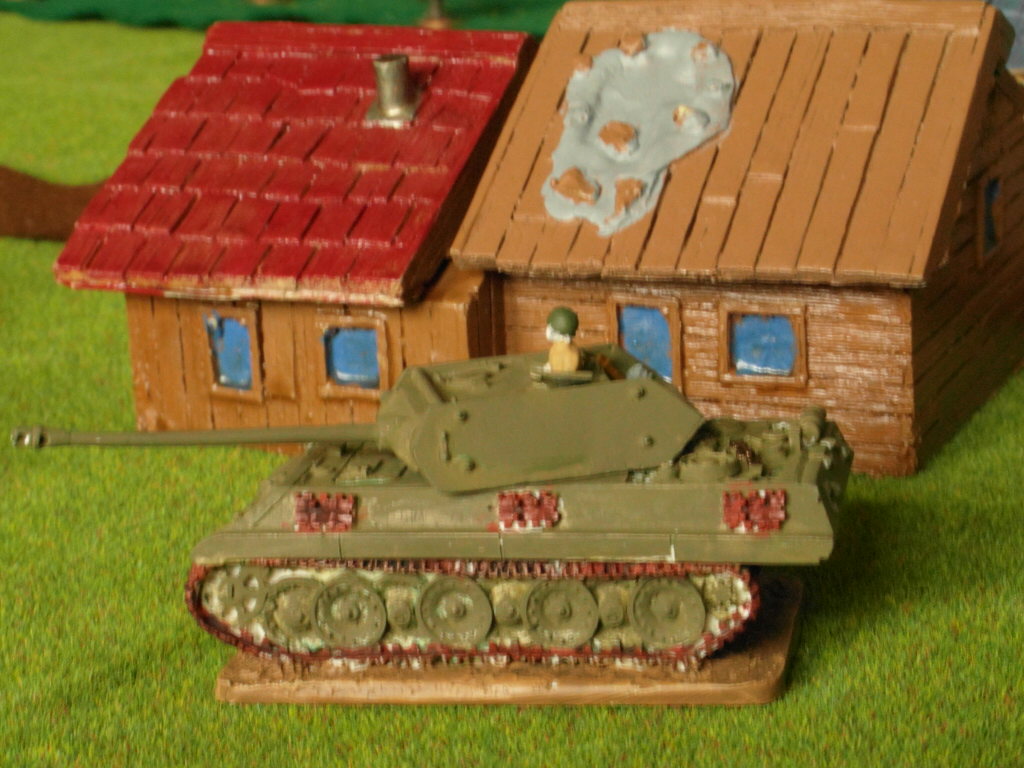
Lone Deff Kopta tries to destroy some Veterans protecting their objective

The Orks kept up the pressure. The Mega Nobz and last wagon mob rolled on. The now wagon-less mob destroyed the melta Vets and their ride. A Wagon rolled over the hydras destroying both. Ghaz and the Kommandos parted ways Ghaz went after the IG base while the Kommandos went after a nearby scoring unit.

Mexi-orks head North

The Guard continued to try to cripple the Ork mobility with another wagon was destroyed due to a vendetta strike. The Kommandos suffered the attention of the nearby command squad and took heavy casualties. The last guard scoring unit dis-embarked and tried to clear the Koptas that were attacking their chimera. The shooting was inconclusive but left the squad exposed to Ghaz and the koptas.

Pirate Orks go hunting Vendetta

The Mega Nobz dis-embarked to secure a another objective. Their wagon drove forward and collected the depleted wagon mob. Ghaz and the koptas finished of the Last guard scoring unit and their chimera as well. The Guard struggled to respond the last wagon was destroyed and Snikrot's mob was finished off but the boyz dig in deep into the objectives. The Vendetta went after Ghaz badly wounding him from long range.
In Response the Orks secured all the available objectives. On that the game ended.

The Result: 17:3

Snikrot's last stand

Mexi-orks got two battle wagons shot out from under them

Vendetta goes Ghaz hunting

Thursday, April 26, 2012

Sitrep (40K): Return to Retcon round 3


Round 3 Vs Floody playing Grey Knights
Deployment: Dawn of War
Primary Objective: Kill Points
Secondary Objective: Capture and Control
The Enemy:
Cortez
5 Henchman squads with razorbacks
1 large henchman squad
2 Storm ravens
3 riflemen dread
2 Venerable dreads
1 Vindicare

This is Grey Knight territory

The Battle:
Orks ain't fond of Grey Knights. Fortunately there were no purifiers present, actually there were no Grey Knights in the list at all. Which makes it interesting twist from the standard canned spam Cortez list. The Orks shooting consisting of six deff koptas may have been lightly outmatched but them is the breaks. The Grey Knight got to go first. The Razorbacks deployed in massaround the Knight's base with the exception of one which joined a rifleman and assassin opposite the Ork base. The remaining riflemen spread evenly across the deployment zone while the Ravens went in the middle waiting for targets. The Orks opted to reserve.

Turns one and two were quiet with the no Orks on the field and so no targets for the Knights. This changed when a single Deff Kopta mob and a token Wagon mob rolled into place. The Wagon secured the Ork base. while the Koptas went after the rifleman and lone Razorback threatening the Ork base. Rockets and Shootas only immobilised the Razorback. The Koptas then assaulted both units to pin the riflemen in combat and avoid a round of Knights shooting. Now with targets the Knights started to move, the two Ravens shuffled forward, aware that Snikrot with Ghaz still had not made an appearance. The Riflemen and the Vindicare put hits on the Wagon but could not cause any damage. Combat ineffective the riflemen failed to hit the koptas. The saw failed to hurt the immobilised razorback and then the koptas failed to break off.

Ghaz sets fire to a lone Rifleman

More Orks started to appear, two Wagons rolled on and took up positions near the Ork base. Ghaz and friends showed up in support of the Koptas. Another Kopta mob arrived and tried to take out the assassin with shooting but failed to have an effect. Ghaz and the Kommandoes assualted in and destroyed the rifleman. The Assassin was able to hold his own gets the kommandoes who then consolidated into him. The Razorback turned out to be Buzzsaw proof, surviving rockets and big shoota attacks as well with only weapons destroyed results.

The Grey Knights began to counter attack. The surving riflemen destroyed one kopta squadron and forced another to flee. A Storm Raven bussed Cortez, his death cultists and and venerable dreadnought into position to rescue the threatened assassin. The cultists attack was devastating with all the Kommandoes slain. Fortunately, the Dread failed to make contact. Ghaz was on his own. Cortez into consolidated into contact followed by the rest of the cultists.

Spot the assassin?

The fleeing kopta finally destroyed the immobilised, weaponless rhino, but predictable the crew took no damage and just hid behind the wreck. A Wagon broke formation and moved forward to debus a choppa mob. Cortez cast sanctuary to make their life difficult. In the end they attack the henchmen and tried to get the assassin which had one wound left. The assassin was out of range but the henchmen were quickly dealt with. Annoyingly Ghaz dropped before he land a good blow on Cortez leaving the Death Cultist free to go after the boyz.

The Knights continued with their counter. A Storm Raven destroyed the out of formation wagon. One rifleman finshed of the fleeing deffe kopta mob another destroyed a wagon from long range. Between the cultists and the Venerable Dread the choppa mob did not last long.  The last Kopta mob finally showed up and tried to sneak into contest the Grey Knight flag but alas the game rolled on and two Koptas vs the Razorback wall did not end well.

The Result: loss 16:4

Tuesday, April 24, 2012

Sitrep (40K); Return to Retcon round 2


Round 2 Vs Rowan playing Necrons
Deployment: Pitched battle
Primary Objective: Capture and control
Secondary Objective: Table quarters. Each table quarter counts as an objective
The Enemy:
2 Lords on Barges
1 Court
3 Necrons squads
2 Wraith Squads
2 Annihilation Barges
1 Ghost Ark

The Battle:
The Orks got to go first. The koptas deployed with the wagons opting for reserve while Snikrot and Ghaz who opted to out flank. The Necrons deployed everything except two squads of Necrons one of which had a crytek attached. Scouting saw the Deff Koptas turbo boost towards the Necron lines.

Turn one started with a hail of rockets and chainsaw attacks which resulted ion a lot of scratched paint. The wraiths replied destroying two of the deff koptas mobs with not loss. The rest of the necrons drifted forward.

Orc reserves began to arrive. Two wagons rolled towards the Necrons unguarded objective while the Nob's wagon set up shop on the Ork objective. Ghaz with Snitrot choose to wait his time. The Necron reserves arrived and the army pushed forward, with shooting having little effect.

The Big Mek dismounted from the Mega-nobz's wagon which in turn surged forward to de-bus the Mega-nobz. The Mega-nobz flames the Ghost Ark and Wraiths hiding behind before destroying the Arc in combat. The Wraith ignored the Nobz and pushed forwards with some |Necrons to threaten the Orks now abandoned objective. The other Wraith pack reinforced a squad of Necrons which moved to protect the Necrons objective. Shooting had little effect the Court tried to damage some wagons and failed while the Barges failed to hurt the rampaging Mega-nobz.

Orks secure the Necron objective

The Orks continued to pile on the pressure. The Mega-nobz smashed an Annihilation Barge that had drifted to close for comfort. Snikrot and Ghaz ambushed the Wraiths and Necrons moving towards Ork base. The Necrons were destroyed while the Wraith ssuffered badly due to fearless saves. Two wagons moves moved to threaten the Necrons home base.

Ghaz ambushes the Necron strike force

With assault on the Ork base stalled the Necrons started to move to protect their own base. A Necron squad with Crytpek tried to deepstrike on to their own objective but scattered of table and was destroyed. The Court and Barges tried to stop the Wagons but had no effect.

Wagon Mob goes after Wraiths

In response the Kommandoes finished of the Wraith threatening the Ork base and moved after a nearby Nercon lord on Barge which was the only Necrons left in the quarter. One of the wagons threatening the Necrons base broke formation and moved sidewise to drop of a Choppa mob who assaulted and destroyed the last Wraith and Necron warrior units in play. The last wagon parked near the Necron base.- The Necron retalited with their lords. The lord nearest the Ork objective tried to assault into contest range of the base but there were too many orks and he was locked in combat outside contest range. The last lord did a swipe attack on the Wagon claiming the Necron objective and destroyed it. He then de-bused to finish off the surviving choppa boyz. The Court and Last Annilation barge tried to finish the mega Nobz that was rampage through the Necron line but with little effect.

Off topic Black Templar demonstrate how not to roll terminator saves

With the Necrons in a bad way the Orks moved in for the Kill. Ghaz destroyed a command barge while the choppa mob guarding the Ork objective cut down the Lord. The Choppa mob contesting the Necron base cut down the challenging lord. The Mega-nobz, now down to Nob, opted to run into an empty table quarter to claim the quarter. On that the game ended.

The Result: Win 18.2


Sunday, April 22, 2012

Sitrep (40K): Return to Retcon round 1


Retcon (UCD 40K tournament) being in Dublin near the Easter Bank holiday. Is a nice trip,  Plus I get to see the folks for more than a couple of hours befopre heading off into boonies of Cark or Galway. For the tournament the Battlewagon boyz rolled into action

Round 1 Vs Ryan playing Space Wolves
Deployment: Spearhead
Primary Objective: Seize ground with five objectives. One in the centre and one in the centre of each corner.
Secondary Objective: Kill points
The Enemy:
1 Rune Priest
1 Wolf guard pack
1 Scout pack
3 Long fang packs with las/plas razorbacks
3 large Grey Hunter packs in rhinos
2 small Grey Hunter packs

The Battle:
It had to start with wolves. Even worse Ryan list had evolved from Iztacon. Less Rune Priests and Scouts and more Grey Hunters. Last time the Orks out numbered the Wolves 4-5 to 1 and got a draw. This time the numbers were about even.

Wolves deploy

The Wolves got to go first and picked the biggest building on the battle field and set-up camp with the Long Fangs going for the high ground while the Grey Hunters secured the lower floors. One Long Fang packs opted to deploy in a rhino to set-up a cross fire on the table. A Grey Hunter pack went into reserve while the scouts opted to out flank. The Orks opted to roll on from reserve.

Grey Hunters on the move

Turn one saw the Wolves spread out seizing nearby objectives and setting up better positions. With no opposition on the table they did the same in turn two. Annoyingly, the scouts also failed to show up. The Orks arrival was preceded by two Deff Kopta squadrons that rolled on and attacked a small Grey Hunter wolf pack that was guarding an objective. The pack broke and barely escaped the Koptas. Two wagon mobs also arrived and secured the objective on the Ork table edge.

Wolf Scouts get on the flank of a Wagon

On queue the Wolf Scouts showed up and popped a Battle wagon. The fleeing wolf pack could not rally and none of the other packs could shake off the koptas that were dogging it. More orks arrived. The two wagon mobs went after the one wolf scout pack looking for pay back. Ghaz and friends assaulted and destroyed a rhino that had drifted to close to the Ork deployment area. The last kopta squadron showed up and assaulted a Long Fang pack. The Wagon mobs made short work of the scouts.

Battle wagon boys move after Wolf Scouts

The Grey Hunters from the rhino Ghaz had destroyed tried to destroyed his battle wagon but failed. A razor back got a side shot on another wagon and destroyed it. Long Fangs struggled to shake of the Deff Koptas but both stayed locked in combat. The last Grey Hunter pack rolled in from reserve and moved to rescue the Long Fangs. The Last Wagon mob arrived and Waaaghed to surround and destroyed the rhino with the Rune Priest and Grey Hunters inside, destroying them all. Ghaz engaged and destroyed the Grey Hunters that had gone after his transport. 

Wild boyz swarm a Rhino pack
Ghaz and friends go Rhino bashing

 The Mega Nobz fell back to secure an objective. Deff Koptas started to run amok taking rear shots at rhinos and razorbacks and generally being a pain in the ass. Snikrot, the kommandos and the wagon mob assaulted the newly arrived Grey Hunters and embattled Long Fangs and destroyed them both. A Razorback tried to tank shock and contest an Ork objective but the wagon mob destroyed it. The Game end with the orks holding or contesting 4 of the 5 of the objectives.

Mexi-orks secure an objective

Komandoes help a wagon mob secure another

The Result: win 19:1

Wednesday, April 18, 2012

WIP (FOW): Kampfgruppe Von Bohme part 2


Nuts,  I have gone from time rich cash poor to cash rich time poor. As a result the to do box is starting to resemble a WWII German tank factory.

PSC Stugs 
(the barrels are kept interchangeable so they can be either Anti tank or anti infantry depending on the need)

First up is kampfgruppe Von Bohme. The last parts for the list finally arrived. Being obsessive and slightly compulsive the initial list has been reinforced with an additional mortar, HMG and AA platoons. I am slightly miffed with Battlefront since I got the light gun battery for the list only to find I can not use it in the list. The box says it is suitable for late war but it turns out that means for Hungarians, not much use for Gebirgjaegers. Rather than shelf the models the plan is to stick the mule base beside the bases to make a heavy mortar and now I have a heavy mortar platoon. I still need to figure what to do with the staff team.

Gebirgjaeger "heavy mortars"

Staff team without a command

Von Bohme's reinforcements, HMG, Mortar, Anti tank platoons


Nearly done (Skytrek's Puppenchen with Battlefront Gebirgsjaeger)

I am also suffering from DYKW syndrome and shiny model syndrome. DKYW affects FOW players usually when they a mid way through or nearly finished their latest army. DKYW occurs when the gamer starts to lok at other lists and mutters to themselves “Do Yon Know What, if I got platoon A and I could turn these guys into company B and effectively have a new army. That is clever I will do that”.

Forged in Battles Stug battery ammunition carriers

Command team

For Kampf gruppe Von Bohme this meant instead of getting the planned one box of Plastic Soldier Company's Stug I got two. So I can now make a Stug (tank) company as well as the existing infantry company.

Forged in Battles Pumas on the prowl (needs decal and weathearing)

The shiny model syndrome is all Forged in Battle's fault. A dozen of their kits have arrived in the last few weeks. I really like the ersatz M10 (panther tank is disguise) and Pumas. I am not sure I will do with the Stug battery support vehicles, they will probably end up as objectives.

Ersatz M10 in progress

Once Kampfgruppe Von Bohme is finished the plan is to move on to form a kampfgruppe from the 18th Volksgrenadiers division.Well equipped but not well trained and responsible for the biggest American defeat in NW Europe, sounds interesting. Skytrek grenadiers are already here I just waiting to see the FOW list for Volksgrenadiers before assembly.

Also more vehicles are planned (PSC panther and half tracks, Battlefront Panzer PiV/70 (V) platoons).I think I have the hang of watering paints now [possible career change to a bar man if needs be :)] I would like try something different painting wise. Someone mentioned a three tone undercoat and somebody else mentioned an undercoat with wash. I wonder what happens if you combine them.

Monday, April 16, 2012

Mission critical (FOW):Schwanenhof, febuary 1945


Design note:
Adapted to FOW from Richard Marsh's Scenarios for NW Europe 1944/45 for Rapid Fire.

Introduction
As part of operation Veritable the Royal Hamilton light infantry (RHLF) of the Canadian 2nd army with support from the Fort Gary Horse tank regiment have been order to capture the village of Schwanenhof. With ample artillery support they were confident of the result, However, the Panzer Lehr division had recently moved into the area and were waiting in reserve to counter-attack.

Canadian first wave arrives

Terrain:
The battle takes place on an 6'x6' table. The ground is open but littered with artillery craters which provide concealment for infantry. The Factory and the village of Schwanenhof areas of concealing terrain. 
Design Note: for the write up I was short on craters show opted to use woods instead.


Tank commander spots something in the distance

The protagonists
Germans
(Defenders, count as a single infantry company for breaking point)

6th Parachute regiment
(Front line units)
1 Parachute platoons with panzerfaust command team, two infantry sections and Panzershreik.
1 Parachute platoons with panzerfaust command team, two infantry sections and with attached HMG.
1 AA platoon with one 88 gun
1 mortar platoon with one section

Panzer Lehr
(Reinforcements,triggered reserves and randomised reserves special rules)
1 Armoured panzer Grenadier command platoon with attach Panzershreiks
4 Armoured panzer platoons full strength each with panzerfaust command team
1 Armoured panzer heavy weapons platoon
1 panzer platoon with 3 Panther tanks
1 panzer platoon with 3 PiV tanks
Canadians
(attackers, count as a single infantry company for breaking point)

Wave one
1 tank platoon at full strength
1 SP anti tank platoon at full strength
2 Infantry platoons at full strength in Ram Kangeroo APCs
1 FOO* (observe linked to a four gun battery off table)

Wave two
Infantry company command platoon at full strength
2 Infantry platoons at full strength
1 Anti tank platoon with two sections
1 Mortar platoon with two sections.
1 Carrier platoon with two sections, one MG section and one wasp section
1 FOO* (observe linked to a four gun battery off table)
1 Sherman OP*

Reinforcements
(triggered reserves and randomised reserves special rules)
see randomised reserves special rule.

* note the two FOO and the Sherman OP spot three separate four gun batteries ie the Canadians have three artillery batteries in support. The CiC can spot for one battery per turn.

88 scores a hit

Deployment and who goes first
The German front line units deploy first and can deploy any where north of the Factory including the Factory itself. One unit can be deployed in ambush. All units can start in prepared positions.

The Canadian first wave moves on in turn one from any point on the Southern table edge. The Canadian second wave moves on in Turn two from any point on the Southern table edge. The German reinforcements arrive an A on the map. The British reinforcements arrive at point B on the map.

The Canadians get the first turn.

Canadians over run the Paratroops first line

Game length
The lasts fifteen turns or until one force breaks or there are no Canadian teams north of the Factory including the factory itself.


Then move on to threaten Schwanenhof
Special rules
1) Triggered reserves
Triggered reserve are rolled for after a certain event happens during the game. For the Germans start rolling for reserves as normal once a  Canadian team moves north of the Factory. For the Canadian eserves start rolling as normal once a German panzer platoon shows up from reserve.

2) Randomised reserves
For the Germans randomly determine which reserve unit arrives for each reserve roll made.
For the  Canadian roll a D6,
1-2 1 infantry platoon (full strength) + 1 tank platoon (full strength)
3-4 2 infantry platoon (full strength) + 1 tank platoon (full strength)
5-6 2 infantry platoon (full strength) + 2 tank platoon (full strength)


German reinforcements race to the rescue

Victory conditions:
The Factory and the village of Schwanenhof are the objectives of the battle. Whichever side controls both at the end of the game is the winner. Anything else is a draw.

While Canadian reserves move to intercept

Saturday, April 14, 2012

Mission critical (40K):Tanks a lot


Background: 
After a particularly viscous battle between the loyalists and rebels on Spandex five. Both side have broken off contact, littering the battlefield with wrecked and abandoned vehicles. As night falls salvage teams from both sides make their way back on to the battlefield to see what they can claim. Each side is willing to recover what ever they can by any means necessary.

The Forces:
Each side has control of a 600 point force chosen from their codex with the following restrictions;
Salvage force
1 HQ or Technical unit*(can not cost more than 100 points including equipment)
2+ troops (each unit can not cost more than 150 points including equipment)
The salvage force may not contain any elite,heavy or fast units and can not bring its vehicles.

*A technical unit would be whatever unit would be responsible for repairing or maintaining the forces vechicles eg Tech marines, Enginseers, etc

Old Breed try stop Iron Warriors from reclaiming a wrecked predator

Terrain:
The battle is fought on a 4'x4' table. Set up the table as normal. Deploy the tanks as per the wrecking yard special rule.

Deployment:
Roll off to pick table edge. The Winner starts the game and moves his models on from his chosen table edge. The opposition moves their models on from the opposite table edge, There are no reserves allowed.

Game length:
The game lasts for eight turns or until all the wrecks are salvaged.

Special rules:
Night fight (see main rule book)

Engiseer inspects Vanquishor under escort

Wrecking yard
The battlefield is covered in wrecked and abandon tanks that both side would like to acquire. Roll 2D6 to see how many wrecks are on the battlefield. Roll a D6 to determine which player gets to place the first wreck. Starting with the first player place one vehicle of any type from their codex on the battle field. The wreck can not be within six inches of the edge or within six inches of another wreck. Players alternate placing wrecks until all the wrecks are deployed.

Salvage squad;
If a Troop unit (not the HQ) ends its turn with one of its models in base contract with a wreck. I can attempt to salvage it. D3 guardsmen (or 1 marine) is removed from the squad and roll a D6 and consult the charge below. Regardless of the result the removed models can not be returned and a wreck can only be salvaged once.

Iron Smith attempts to recover a Predator

  1. Write off – the wreck counts as being salvaged but takes no further part in the game
  2. Out of Ammunition - the wreck counts as being salvaged. In addition the controlling player can now move but not shoot the vehicle.
  3. Drive damage- the wreck counts as being salvaged. In addition the controlling player can now shoot one randomly determined weapon but not move the vehicle.
  4. Track damage- the wreck counts as being salvaged. In addition the controlling player can now shoot all weapons but not move the vehicle.
  5. Not bad- the wreck counts as being salvaged. In addition the controlling player can now move and shoot one randomly determined weapon .
  6. Jackpot- the wreck counts as being salvaged. In addition the controlling player can fully use the vehicle for the rest of the game.
Victory conditions:
Which ever side salvages the most wrecks is the winner.

Old Breed takes aim